Grow Plum from Seeds: Unlock the Secrets to a Bountiful Harvest
Growing plums from seeds is a simple process that requires proper seed preparation, planting in suitable soil, and consistent care. By following these steps, you can successfully grow your own plum tree and enjoy its delicious fruits in the future.
Planting plum trees from seeds is an exciting and rewarding endeavor that allows you to witness the entire growth cycle firsthand. While most plum trees are grown from grafts or cuttings, growing from seeds can be a fun and educational experience.
With proper preparation and care, you can successfully grow a plum tree from a seed and eventually enjoy its juicy and flavorful fruits. In this guide, we will discuss the step-by-step process for growing plums from seeds, including seed preparation, planting, and ongoing care. So let’s get started and delve into the world of growing plums from seeds.

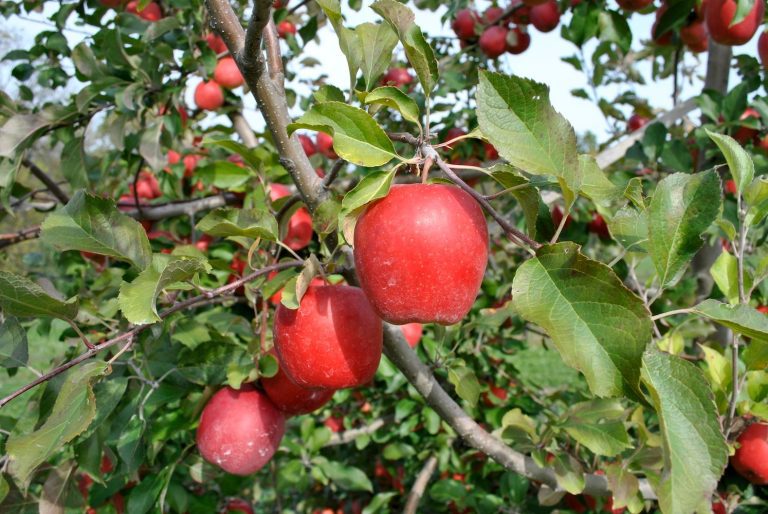
Credit: savvygardening.com
Choosing The Perfect Plum Seeds
Learn how to choose the perfect plum seeds for growing plum trees at home. With these helpful tips, you can ensure successful growth and enjoy delicious plums straight from your own garden.
Factors To Consider When Selecting Plum Seeds:
- Consider the ripeness of the fruit: Look for plums that are fully ripe but not overripe. The seeds from overly ripe plums may not germinate well.
- Choose healthy plums: Opt for plums without any signs of disease or damage. Healthy plums will give you a higher chance of obtaining healthy seeds.
- Consider the plum variety: Different plum varieties have different seed characteristics and growth habits. Choose a variety that suits your preferences and growing conditions.
- Freshness matters: Select plums that are fresh, as older and shriveled plums may have less viable seeds.
- Consider the pollination requirements: Some plum varieties require cross-pollination with another variety to set fruit. If your goal is to grow a specific plum variety, ensure you have access to suitable pollinators.
Identifying Plum Varieties Suitable For Seed Propagation:
- Self-pollinating varieties: If you are looking for an easier propagation process, choose self-pollinating plum varieties. These varieties can produce viable seeds without requiring cross-pollination.
- Open-pollinated varieties: Open-pollinated plum varieties have a higher chance of producing offspring with similar characteristics to the parent plant. If you have a particular plum tree you admire, you can choose to propagate from its seeds.
- Disease-resistant varieties: Consider selecting plum varieties that are known for their resistance to common plum diseases. This will help ensure the health and longevity of the resulting seedlings.
Importance Of Seed Source And Quality:
- Choose reputable seed suppliers: When purchasing plum seeds, it is essential to buy from trusted sources. Reputable seed suppliers provide seeds that are more likely to be true to the labeled variety.
- Freshness of seeds: Fresh seeds have a higher germination rate compared to older seeds. Check the packaging date or inquire about the seed’s freshness before purchasing.
- Avoid genetically modified (gm) seeds: To maintain the natural characteristics of plum trees, it is best to avoid using gm seeds. Opt for organic or heirloom seeds whenever possible.
Remember, selecting the perfect plum seeds is vital in setting the foundation for healthy and productive plum trees. By considering factors such as ripeness, variety suitability, and seed source quality, you increase your chances of successful seed germination and a thriving plum orchard.
Happy planting!
Unlocking The Secrets Of Successful Plum Germination
Discover the secrets to successfully growing plums from seeds and unlock the potential of your own plum orchard. Learn the essential steps to germinate plum seeds and nurture them into healthy, fruitful trees.
Preparing The Ideal Germination Environment:
- Choose a sunny location: Plum seeds require plenty of sunlight to germinate successfully. Select a spot in your garden or yard that receives at least 6-8 hours of direct sunlight each day.
- Optimal soil conditions: Plum seeds prefer well-draining soil with a slightly acidic ph level between 6.0 and 6.5. Ensure the soil is loose and fertile, rich in organic matter.
- Soil preparation: Clear the planting area of any weeds or grass. Loosen the soil using a garden fork or tiller, breaking up any clumps and removing rocks or debris.
- Adding compost: To provide essential nutrients, mix in a generous amount of compost or well-rotted manure. This will improve the soil’s fertility and enhance moisture retention.
- Moisture requirements: Plum seeds require consistent moisture for successful germination. Ensure the soil remains moist but not waterlogged. Use a watering can or a gentle spray to moisten the soil regularly.
Step-By-Step Guide To Planting Plum Seeds:
- Harvesting plum seeds: Start by collecting ripe plums from your tree or buy fresh plums from the grocery store. Cut the plum open and remove the seeds, ensuring to clean off any fruit flesh.
- Seed stratification: Plum seeds require a period of cold stratification to break their dormancy. Place the clean seeds in a damp paper towel or sealed plastic bag and refrigerate for 8-12 weeks.
- Preparing the seeds: After stratification, soak the seeds in water for 24-48 hours. This will help soften the seed coat and improve germination rates.
- Planting the seeds: Fill small pots or seed trays with the prepared soil mixture. Place one seed in each pot, burying it about 1 inch deep. Gently pat down the soil to ensure good seed-to-soil contact.
- Water and cover: Thoroughly water the pots and cover them with a plastic wrap or a clear plastic lid to create a mini greenhouse effect. This will help maintain soil moisture and provide a warm environment for germination.
- Placement and temperature: Find a warm location for the pots, ideally around 70-75°f (21-24°c). Keep them away from direct sunlight to prevent the soil from drying out too quickly.
- Germination period: Plum seeds typically take 2-4 weeks to germinate. During this time, regularly check the soil moisture and ensure it remains consistently moist. Avoid overwatering, as this can lead to fungal issues.
- Transplanting seedlings: Once the seedlings have developed a few sets of true leaves and are sturdy enough, transplant them into larger individual pots or directly into the garden.
Tips For Ensuring Successful Germination:
- Harvest fresh seeds: Use freshly harvested seeds for the best germination success. Avoid using seeds that have been stored for a long time, as their viability may decrease.
- Adequate moisture: Maintain consistent moisture throughout the germination process. Dry soil can inhibit seed germination, while excessively wet soil can lead to rotting.
- Warmth and sunlight: Provide a warm and sunny environment for the seeds to germinate. Ensure they receive sufficient light but avoid exposing them to scorching temperatures.
- Patience is key: Plum seeds can take several weeks to germinate, so be patient and don’t give up hope too soon. Continue to provide the optimal conditions and monitor their progress.
- Thin out weak seedlings: If multiple seedlings emerge from one pot, carefully remove the weaker ones, allowing the strongest seedling to thrive.
Remember, successful plum germination requires careful preparation, appropriate planting techniques, and proper environmental conditions. By following these guidelines, you’ll be well on your way to growing your own plum trees from seeds.
Nurturing Your Plum Seedlings To Maturity
Nurture your plum seedlings for successful growth from seeds. Learn the essential steps to ensure their maturity and better fruit production.
Plum seedlings require proper care and attention to ensure healthy growth and successful maturity. By providing the optimal growing conditions, implementing appropriate fertilization and watering techniques, and protecting the seedlings from pests and diseases, you can increase the chances of your plum trees thriving.
Here are some essential steps to guide you in nurturing your plum seedlings:
Providing The Optimal Growing Conditions For Plum Seedlings:
- Choose a suitable location: Select a sunny spot in your garden with well-drained soil to encourage optimal growth.
- Prepare the soil: Before planting the seedlings, ensure the soil is loamy and rich in organic matter. This will provide the necessary nutrients for the young plants to thrive.
- Maintain proper spacing: Allow sufficient space between the seedlings, typically 10 to 20 feet apart, to allow them to grow and develop without crowding.
Fertilization And Watering Techniques For Healthy Growth:
- Use organic fertilizers: Apply a balanced, slow-release organic fertilizer during the growing season to provide essential nutrients to the plum seedlings.
- Water consistently: Plum seedlings require regular watering to establish deep roots. Water the plants deeply once or twice a week, providing enough water to moisten the soil around the roots.
Protecting Seedlings From Pests And Diseases:
- Mulch around the seedlings: Apply a layer of organic mulch, such as wood chips or straw, around the base of the plum seedlings. Mulching helps retain moisture, control weeds, and protect the plants from temperature fluctuations.
- Monitor for pests: Regularly inspect the seedlings for signs of pests such as aphids or caterpillars. If detected, consider using organic pest control methods or consult with a gardening expert.
- Disease prevention: Ensure good air circulation around the plum seedlings and avoid excessive moisture to minimize the risk of fungal diseases. Prune any infected or dead branches promptly.
By following these nurturing techniques, you can provide your plum seedlings with the best chance for healthy growth and eventual maturity. Remember to monitor their progress regularly, adjust care as needed, and be patient as your plum trees develop into productive and beautiful additions to your garden.
Pruning And Shaping Your Plum Tree For Optimum Yield
Learn how to grow plums from seeds and get the best yields by pruning and shaping your plum tree. By following these techniques, you can optimize the growth and productivity of your plum tree in a sustainable manner.
Benefits Of Pruning Plum Trees
Pruning your plum trees not only keeps them visually appealing but also promotes healthy growth and improves fruit production. Here are some key benefits of pruning plum trees:
- Increased sunlight penetration: Pruning helps improve airflow and allows more sunlight to reach the inner branches, ensuring better fruit development.
- Enhanced fruit quality: By removing dead, diseased, or damaged branches, you can prevent the spread of diseases and pests, resulting in healthier and tastier plums.
- Controlled tree size: Regular pruning helps control the size of your plum tree, making it easier to manage and harvest the fruit.
- Promoted new growth: Pruning encourages the development of new shoots and branches, which leads to increased fruit-bearing capacity.
- Prevention of branch overcrowding: Removing excess branches helps reduce competition for sunlight, nutrients, and water, leading to optimal fruit yield.
- Shaped tree structure: Pruning aids in creating a well-balanced and structurally sound plum tree, promoting proper fruit distribution and ease of maintenance.
Techniques For Pruning Young Plum Trees
Pruning young plum trees is essential to establish a strong framework for future growth. Here are some effective techniques to consider:
- Formative pruning: Begin by removing any competing branches that grow too closely together. Maintain a central leader, which is the main vertical stem, and prune side branches to encourage a balanced framework.
- Removing deadwood: Take the opportunity to identify and remove any dead or diseased wood during pruning sessions. This helps prevent the spread of diseases and promotes overall tree health.
- Heading back: Trim the branches by cutting them back to an outward-facing bud or lateral branch. This technique encourages new growth in the desired direction and helps shape the tree.
- Training branches: Use ties or stakes to guide the growth of young branches, ensuring they develop in the desired direction. This helps establish a well-structured tree and prevents weak angles of growth.
- Thinning out: As the tree develops, remove overcrowded branches to improve light penetration and airflow. This allows the remaining branches to receive sufficient resources and promotes fruit development.
Shaping The Tree To Encourage Fruit Production
Shaping your plum tree appropriately plays a vital role in maximizing fruit production. Here are some strategies to shape your plum tree for optimum yield:
- Open center pruning: This technique involves removing the central leader and encouraging a vase-like shape. It allows for better light penetration and air circulation, promoting increased fruiting along the branches.
- Heading cuts: Use heading cuts to stimulate growth in desired areas. Trim the branches just above an outward-facing bud to encourage lateral growth and fruit production.
- Branch selection: Choose strong and healthy branches to retain and remove weak or crossing branches during shaping. This ensures the tree maintains a sturdy structure and prevents unnecessary competition.
- Canopy management: Regularly thin out the canopy to improve light penetration, which is crucial for fruit development. Aim for an open and well-spaced canopy to foster healthy growth and maximize fruit yield.
- Prune for size control: Adjust the overall size of the tree as needed, depending on the available space and your ability to manage the tree. Restricting the size helps promote easier maintenance and efficient harvesting.
By following these pruning and shaping techniques, you can maintain a healthy and productive plum tree, yielding delicious fruits for years to come. Remember to prune during the dormant season to minimize stress on the tree and maximize its response to pruning efforts.
Caring For Your Plum Tree As It Bears Fruit
Learn how to grow plum trees from seeds and care for them as they bear fruit, ensuring a healthy and bountiful harvest. From proper planting techniques to watering and pruning tips, this guide will help you nurture your plum tree to its full potential.
Growing a plum tree from seeds is a rewarding experience, but once your tree starts bearing fruit, there are essential steps to ensure its health and productivity. From assessing its health and nutrient requirements to protecting against diseases and pests, here’s how to care for your plum tree effectively:
Assessing The Health And Nutrient Requirements Of Your Plum Tree
To maintain a healthy plum tree and maximize fruit production, it’s crucial to regularly assess its health and fulfill its nutrient requirements. Here’s what you should consider:
- Regular inspection: Conduct regular visual inspections of your plum tree to check for any signs of damage, disease, or pests. Look for abnormally colored leaves, wilting branches, or unusual growth patterns.
- Soil testing: Conduct soil tests to determine its ph level and nutrient content. Plum trees thrive best in well-draining soil with a slightly acidic ph range of 5.5 to 6.5. Adjust the soil acidity if needed by adding lime or sulfur.
- Fertilization: Provide your plum tree with balanced fertilizer based on the results of the soil test. Feed established plum trees in early spring before bud break to ensure optimal nutrient uptake and fruit production.
- Pruning: Regularly prune your plum tree to maintain its shape and remove damaged, diseased, or crowded branches. Pruning encourages air circulation and sunlight penetration, reducing the risk of diseases and promoting healthy growth.
Maintaining Proper Watering And Fertilization Throughout The Growing Season
Proper irrigation and fertilization are crucial for the healthy growth and fruitful yield of your plum tree. Follow these guidelines to maintain adequate moisture and provide essential nutrients:
- Watering: Plum trees require consistent moisture, especially during the growing season and fruit development. Water deeply and thoroughly, ensuring the soil is evenly moist without becoming waterlogged. Provide approximately 1 to 1.5 inches of water per week, adjusting as needed depending on weather conditions.
- Mulching: Apply a layer of organic mulch around the base of your plum tree, keeping it a few inches away from the trunk. Mulch helps retain soil moisture, suppresses weed growth, and moderates temperature fluctuations.
- Fertilizing: During the growing season, apply a balanced fertilizer formulated for fruit trees. Follow the manufacturer’s instructions for dosage and timing. Avoid over-fertilization, as it can lead to excessive foliage growth at the expense of fruit production.
- Monitoring: Regularly monitor the soil moisture level and adjust the watering schedule accordingly. Pay attention to any signs of nutrient deficiencies, such as yellowing leaves or stunted growth, and address them promptly with appropriate fertilization.
Protecting Against Common Plum Tree Diseases And Pests
Plum trees are susceptible to various diseases and pests that can impact their overall health and fruit quality. Employ preventive measures and early intervention to protect your tree:
- Disease prevention: Ensure good air circulation by pruning your plum tree regularly. Remove any fallen leaves or fruits, as they can harbor disease-causing pathogens. Apply fungicides as directed to prevent diseases such as brown rot or leaf spot.
- Pest control: Monitor your plum tree for common pests like aphids, plum curculio, or plum moth. Employ natural methods such as introducing beneficial insects or using insecticidal soaps to control them. Consider using pheromone traps to catch and monitor specific pests.
- Integrated pest management: Implement integrated pest management (ipm) techniques, which involve a combination of preventive measures, biological controls, and, if necessary, targeted pesticide applications. Ipm minimizes the impact on beneficial insects and the environment while effectively managing pests.
- Regular inspections: Conduct regular inspections to catch any signs of diseases or pests early. Prompt action increases the chances of successfully treating or managing the issue before it escalates.
By assessing the health and nutrient requirements of your plum tree, maintaining proper watering and fertilization, and taking measures to protect it from diseases and pests, you can ensure the fruitful growth and longevity of your plum tree. Enjoy the bountiful harvests that your well-cared-for tree will provide for years to come.
Harvesting And Enjoying The Fruits Of Your Labor
Discover the joy of growing plum trees from seeds and reaping the rewards of your efforts with a bountiful harvest. Savor the delicious taste of homegrown plums and experience the satisfaction of growing your own fruit.
Signs Of Plum Readiness For Harvest
- Plum trees usually bear fruit in the summer, but knowing when to pick the plums can be tricky. Here are the signs to look out for:
- Softness: Ripe plums will yield slightly when gently pressed, indicating juiciness and ripeness.
- Color: Pay attention to the fruit’s color, which varies depending on the variety. Look for plums with a deep, vibrant hue.
- Skin texture: The skin of ripe plums will appear smooth and free of blemishes. Avoid fruits with wrinkled or damaged skin.
- Firmness: While ripe plums give slightly when pressed, they should still retain a certain degree of firmness. If they feel overly soft, they may be overripe.
Harvesting Techniques For Plum Fruits
- When it’s time to harvest your plums, follow these techniques to ensure you gather the fruits without causing damage:
- Using both hands, gently twist the plum from the tree. If it doesn’t come off easily, it might not be ready for harvest.
- Be careful not to tug or pull forcefully, as this may damage the fragile branches or leave behind parts of the fruit.
- Use pruning shears or sharp scissors to cut the plums if they are particularly resistant to twisting.
- Place harvested plums into a shallow basket or container, taking care not to stack them too deeply to avoid bruising.
Exploring Delicious Recipes To Enjoy Your Plum Harvest
- Once you have harvested your plums, there are various ways to enjoy their delicious flavors. Here are some tasty recipes to try:
- Plum tart:
- Combine sliced plums with a buttery crust for a mouthwatering tart. Bake until the plums are soft and the crust is golden brown.
- Plum chutney:
- Create a tangy condiment by simmering plums with vinegar, onions, and a blend of spices. Perfect for pairing with cheese or grilled meats.
- Plum jam:
- Transform your plums into a sweet spread by cooking them down with sugar and lemon juice. Perfect for spreading on toast or scones.
- Plum crumble:
- Top halved plums with a mixture of flour, sugar, and butter to create a delightful crumbly dessert. Serve with a scoop of vanilla ice cream.
Remember, with a little creativity, your freshly harvested plums can be transformed into a range of delicious treats that will make all of your hard work worthwhile.
Troubleshooting Common Issues In Plum Tree Growth
Troubleshooting common issues in plum tree growth is essential when trying to grow plum trees from seeds. This process requires careful attention to soil quality, watering, pests, diseases, and pruning techniques to ensure healthy and fruitful growth.
Identifying And Addressing Common Plum Tree Problems
Plum trees are relatively easy to grow, but like any other plant, they can encounter a few issues along the way. If you notice any problems with your plum tree’s growth, it’s essential to identify and address them promptly. Here are some common issues you may encounter and how to troubleshoot them:
- Leaf discoloration:
- Yellowing leaves: This may be a sign of nutrient deficiencies or overwatering. Check the soil’s moisture levels and adjust watering accordingly. Consider adding a balanced fertilizer to provide the necessary nutrients.
- Brown or black spots on leaves: These spots could indicate a fungal or bacterial infection. Prune affected branches and dispose of them properly. Apply a fungicide or bactericide recommended for plum trees to prevent the infection from spreading.
- Fruit drop:
- Premature fruit drop: Insufficient pollination or poor fertilization may cause fruits to drop prematurely. Encourage pollination by introducing bees or other pollinators to your garden. Ensure the plum tree receives adequate water and nutrients.
- Excessive fruit drop: Factors like poor weather conditions, insect pests, or diseases can cause an excessive drop of fruit. Examine the tree for signs of pests or diseases and take appropriate action. Provide proper care, including regular watering and appropriate fertilization, to maintain the tree’s health.
- Other issues:
- Wilting branches: Wilting branches could indicate a lack of water or a fungal infection. Check the soil moisture levels and adjust watering accordingly. If the wilting persists, prune and dispose of affected branches and consider applying a fungicide.
- Pest infestation: Common pests that affect plum trees include aphids, plum curculio, and scale insects. Regularly inspect your tree for signs of pests, such as distorted leaves, holes in fruits, or sticky residue on leaves. Use appropriate insecticides or natural pest control methods to combat the infestation.
- Disease outbreaks: Plum trees can be susceptible to diseases such as brown rot and powdery mildew. Monitor your tree for any signs of these diseases, such as fruit rot or powdery white growth on leaves. Remove and destroy any infected plant material and consider applying preventive fungicides.
Solutions For Leaf Discoloration, Fruit Drop, And Other Issues
When facing any problems with your plum tree, troubleshooting and finding effective solutions can help restore its health and productivity. Here are some steps you can take to address common issues:
- Leaf discoloration:
- Monitor soil moisture levels and adjust watering as needed.
- Apply a well-balanced fertilizer specifically formulated for fruit trees.
- Prune and dispose of affected branches to control the spread of diseases.
- Apply recommended fungicides or bactericides to combat infections.
- Fruit drop:
- Encourage pollination by attracting bees and other pollinators.
- Ensure the tree receives adequate water, sunlight, and nutrients.
- Identify and address pests or diseases affecting the tree.
- Maintain proper tree care practices, including pruning and fertilization.
- Other issues:
- Adjust watering levels based on soil moisture requirements.
- Prune and dispose of wilted branches to prevent disease spread.
- Implement insect control measures to combat pest infestations.
- Apply preventive fungicides to protect against disease outbreaks.
Remember, some plum tree problems may require professional help. If the issues persist or if you’re unsure how to proceed, it’s best to consult with a certified arborist or horticulturist for expert advice.
Growing plum trees from seeds can be a fulfilling experience, and by promptly addressing common issues, you can ensure the tree thrives and rewards you with delicious fruits for years to come.
Time To Get Your Hands Dirty: Start Growing Plums From Seeds
Discover the joy of growing plums from seeds and get ready to dig in and get your hands dirty. With a few simple steps, you can watch your own plum tree grow and enjoy the sweet taste of homegrown fruit.
Start your journey to becoming a plum grower today!
Planting plum seeds is an exciting and rewarding endeavor that allows you to nurture your very own plum tree from the ground up. Rather than relying on store-bought saplings, starting from seeds offers a unique experience and allows you to witness the growth and development of your plum tree right from its humble beginnings.
In this guide, we will take you through the process step-by-step, from gathering necessary materials to successful seed propagation. So grab your gardening gloves and let’s get started!
Gathering Necessary Materials For Planting Plum Seeds:
To begin your plum-growing journey, you’ll need a few essential items. Before you get your hands dirty, make sure you have the following materials in place:
- Plum seeds: Collect ripe plums from a local farmer’s market or your own backyard. Ensure the fruits are fully matured to guarantee viable seeds.
- Potting soil: Opt for a well-draining soil mix specifically designed for seed germination. This will provide the necessary nutrients and moisture retention for successful growth.
- Seed trays or pots: Choose containers that are at least 3-4 inches deep, allowing ample space for root development.
- Plastic wrap or a mini greenhouse: This will create a warm and humid environment to encourage germination.
- Watering can or spray bottle: Use a gentle misting technique to avoid disturbing the delicate seeds during the watering process.
- Plant labels: It’s essential to keep track of your seedlings, especially when growing multiple varieties.
Step-By-Step Guide To Starting Your Plum Tree From Seed:
Now that you have all the necessary materials, let’s dive into the step-by-step process of starting your plum tree from seed:
- Extract the seeds: Cut open the ripe plums and remove the seeds. Rinse them under cool water to remove any residual fruit flesh.
- Prepare the pots: Fill the seed trays or pots with the potting soil, leaving about an inch of space from the rim.
- Plant the seeds: Place the plum seeds about an inch deep into the soil, spacing them a few inches apart. Gently pat down the soil to ensure good seed-to-soil contact.
- Provide moisture: Lightly water the soil, making sure not to oversaturate it. Cover the pots with plastic wrap or a mini greenhouse to create a humid environment.
- Place in a warm spot: Find a warm location with indirect sunlight for optimum germination. Avoid exposing the seeds to direct sunlight, as it can dry out the soil.
- Monitor and water: Check the pots daily and mist the soil with water to keep it constantly moist. Avoid allowing the soil to dry out completely.
- Germination period: In about 2-3 weeks, you should start to see the plum seeds sprouting. Once the seedlings reach a height of 2-3 inches, it’s time to transplant them into individual pots.
- Transplanting: Carefully loosen the soil around the seedlings and gently lift them out. Plant each seedling in a separate pot with fresh potting soil, ensuring the roots are well-covered.
- Continued care: Place the newly transplanted plum seedlings in a sunny location and water them regularly, keeping the soil consistently moist. Monitor the growth and provide support as needed.
- Outdoor planting: Once the seedlings have matured, typically after a year or two, select a suitable location in your garden to plant your plum tree. Ensure it receives adequate sunlight and has well-draining soil.
Tips And Tricks For Successful Seed Propagation:
When it comes to successfully growing plum trees from seeds, here are some additional tips and tricks to keep in mind:
- Stratification: Some plum seeds may require a period of cold stratification to break dormancy. Place them in a moist paper towel inside a plastic bag and refrigerate for 4-6 weeks before planting.
- Adequate drainage: Ensuring proper drainage is crucial to avoid waterlogged soil, which can lead to root rot. Choose containers with drainage holes or add a layer of gravel at the bottom of the pots.
- Pruning: Regular pruning helps shape the tree and promotes healthy growth. Trim back any dead or diseased branches and maintain an open canopy to allow sunlight to reach all parts of the tree.
- Pollination: Keep in mind that plum trees require cross-pollination for fruit production. Consider planting multiple trees to ensure proper pollination and maximize fruit yield.
- Patience is key: Growing plum trees from seeds requires time and patience. It may take several years for your tree to bear fruit, but the journey itself is an incredibly rewarding experience.
Now that you have all the necessary information and materials, it’s time to roll up your sleeves and start growing your own plum tree from seeds. Embrace the process, enjoy watching your seedlings grow, and soon enough, you’ll be harvesting delicious plums straight from your backyard orchard.
Happy gardening!
Frequently Asked Questions Of Grow Plum From Seeds
Can I Grow A Plum Tree From A Plum Seed?
Yes, you can grow a plum tree from a plum seed. Simply plant the plum seed in moist soil, keeping it at a depth of about 1-2 inches. Provide enough sunlight and water regularly. It usually takes about 3-5 years for the tree to bear fruit.
Growing a plum tree from seed can be a fun and rewarding experience. However, keep in mind that the resulting tree may not produce fruit identical to the parent plum.
How Do You Germinate Plum Seeds?
To germinate plum seeds, follow these steps. First, remove the seeds from the ripe plum fruit. Next, place the seeds in a container with moist potting soil. Ensure the seeds are covered with a thin layer of soil. Then, water the soil lightly.
Keep the container in a warm and sunny location, but avoid direct sunlight. It will take around 2 to 3 weeks for the seeds to germinate. During this time, regularly check the soil moisture and keep it damp, not soggy.
Once the seedlings emerge, move them to individual pots with well-draining soil. Finally, continue to care for the seedlings by providing adequate sunlight and watering. In about 2 years, the young plum trees should be ready for planting outdoors.
How Long Does It Take To Grow A Plum Tree From Seed?
Growing a plum tree from seed typically takes 4-6 years before it bears fruit. However, it can vary depending on several factors such as the plum variety, growing conditions, and care provided. It is important to note that growing plum trees from seed may not guarantee the same characteristics as the parent plant.
For faster results, consider purchasing a grafted plum tree from a nursery, which usually starts producing fruit within 2-3 years. To grow a plum tree from seed, start by planting the seed in a well-draining soil mix in a pot.
Keep the soil consistently moist and provide plenty of sunlight. As the seedling grows, gradually increase pot size to accommodate its roots. Once the tree is large enough and the weather permits, it can be transplanted into the ground. Regular watering, proper pruning, and fertilization will be crucial for healthy tree growth.
Do Plums Grow True From Seed?
Yes, plums can grow true from seed.
Conclusion
Growing plums from seeds is an enjoyable and rewarding gardening adventure. With a bit of patience and the right techniques, you can successfully propagate plum trees at home. Remember to choose fresh, healthy seeds from a mature plum, and provide them with proper care during the germination process.
Following the simple steps of cold stratification, seed soaking, and planting in rich soil will give your plums the best chance to thrive. As the seedlings grow, make sure to provide them with adequate sunlight, water, and nutrients. With time and care, your plum trees will develop into beautiful, fruit-bearing plants.
Watching your trees mature and harvesting sweet, juicy plums from your own backyard will be a deeply satisfying experience. Start your plum-growing journey today and enjoy the fruits of your labor in the years to come.